You may be thinking you don’t have the space to grow food. Not to worry. This is perhaps the most nutrient density we can grow in the tiniest, most delicious delivery system: SPROUTS!
Sprouting is a natural process that unlocks the potential of seeds, grains, and legumes, transforming them into highly nutritious and easily digestible foods.
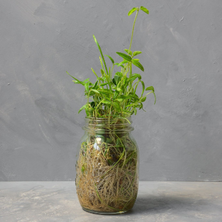
Here is the sprouting jar kit I use.
Depending on how bright your kitchen is, this kit comes with covers so that your sprouts can stay in the dark. I also like this set because it keeps the jars on tilt so that ALL the water drains out. It is important to let them dry out between rinses, so they don’t mold!
Purchase any seeds you wish. I like an organic salad mix. (Like this)
Place 1-2 TBSP of sprouts in fresh water. (Use about 3x the amount of water to seed ratio.)
Keep them in a dark place at room temperature for 8-12 hours. This starts the germination process!
Pour out the water and rinse.
Rinse every morning and night until your sprouts are the size that you want. (Usually about 5-7 days. I generally start eating them while they’re still growing.)
If I haven’t finished the jar by the time they’re done, just place your jar in the fridge.
Finish your sprouts and start again!
I like having my two jars on opposite rotation, so I always have fresh sprouts in the house!
Happy Sprouting! Enjoy!
Sprouting is a natural process that unlocks the potential of seeds, grains, and legumes, transforming them into highly nutritious and easily digestible foods.
Here is the sprouting jar kit I use.
Depending on how bright your kitchen is, this kit comes with covers so that your sprouts can stay in the dark. I also like this set because it keeps the jars on tilt so that ALL the water drains out. It is important to let them dry out between rinses, so they don’t mold!
Purchase any seeds you wish. I like an organic salad mix. (Like this)
Place 1-2 TBSP of sprouts in fresh water. (Use about 3x the amount of water to seed ratio.)
Keep them in a dark place at room temperature for 8-12 hours. This starts the germination process!
Pour out the water and rinse.
Rinse every morning and night until your sprouts are the size that you want. (Usually about 5-7 days. I generally start eating them while they’re still growing.)
If I haven’t finished the jar by the time they’re done, just place your jar in the fridge.
Finish your sprouts and start again!
I like having my two jars on opposite rotation, so I always have fresh sprouts in the house!
Happy Sprouting! Enjoy!


 RSS Feed